


As a developer, while setting up a new project, we want our code to be clean, readable, and maintainable. To achieve this, we can use tools like ESLint, Prettier, and Husky in the React application.
Understanding the tools
ESLint
ESLint is a popular tool for identifying and reporting patterns found in ECMAScript/JavaScript code. It helps in catching errors and enforcing a consistent coding style.Prettier
Prettier is a code formatter that helps automatically format code in a consistent style.
Husky
Husky is a tool for enforcing Git hooks, which helps run scripts before committing or pushing the code.
This blog will follow the steps required to set up EsLint, Prettier, and Husky in a react application.
Step 1: Create a React Application
First, we need to create a new react application. You can do this by running the following command in your terminal:
npx create-react-app my-app
Step 2: Install Eslint, Prettier and Absolute Import
Then install eslint, prettier and Absolute Import. You can do this by using the following command in your terminal :
npm install --save-dev @babel/core @babel/eslint-parser @babel/preset-react eslint eslint-config-prettier eslint-import-resolver-jsconfig eslint-plugin-import eslint-plugin-prettier eslint-plugin-react prettier
Step 3: Add Eslint config file
Create a new file .eslintrc.json at the root of your project. The .eslintrc.json is used to define the configuration structure. Alternatively, the eslint config file can also be generated by using eslint --init . You will be asked a few questions regarding the code conventions to be followed.
{
    "env": {
      "browser": true,
      "es2021": true,
      "node": true,
      "jest": true
    },
    "parser": "@babel/eslint-parser",
    "parserOptions": {
      "ecmaFeatures": {
        "jsx": true
      },
      "requireConfigFile": false,
      "ecmaVersion": 12,
      "sourceType": "module",
      "babelOptions": {
        "presets": [
          "@babel/preset-react"
        ]
      }
    },
    "extends": [
      "eslint:recommended",
      "plugin:react/recommended",
      "plugin:react/jsx-runtime",
      "plugin:prettier/recommended",
      "plugin:import/react"
    ],
    "plugins": [
      "react",
      "import"
    ],
    "settings": {
      "react": {
        "version": "detect"
      },
      "import/resolver": {
        "node": {
          "extensions": [
            ".js",
            ".jsx"
          ],
          "moduleDirectory": [
            "node_modules",
            "src"
          ]
        }
      }
    },
    "rules": {
      "prettier/prettier": [
        "error",
        {
          "singleQuote": true
        }
      ],
      "linebreak-style": [
        "error",
        "unix"
      ],
      "quotes": [
        "error",
        "single",
        {
          "avoidEscape": true
        }
      ],
      "semi": [
        "error",
        "always"
      ],
      "no-trailing-spaces": "error",
      "no-console": "error",
      "no-unused-vars": [
        "error",
        {
          "argsIgnorePattern": "^_"
        }
      ],
      "react/no-unescaped-entities": "off",
      "react/require-default-props": "error",
      "sort-imports": [
        "error",
        {
          "ignoreCase": true,
          "ignoreDeclarationSort": true
        }
      ],
      "import/no-unresolved": [
        "error",
        {
          "commonjs": true,
          "amd": true
        }
      ],
      "import/named": "error",
      "import/namespace": "error",
      "import/default": "error",
      "import/export": "error"
    }
  }
The above file specifies the environment, globals, rules, and plugins.
Step 4: Setup Absolute Imports
Usually, we import files like this ../../../Components/ProfilePage , this way of importing components is known as relative imports. Relative paths are hard to follow and break as the project gets complex. Instead, we can use absolute paths for adding imports. This can be done by adding a jsconfig.json file at the root level of our project.
{
    "compilerOptions": {
        "baseUrl": "src",
        "module": "commonjs",
        "target": "es6"
    },
    "include": [
        "src"
    ],
    "paths": {},
    "exclude": [
        "node_modules"
    ]
}
After adding the commands the imports can be reorganised as :
// Absolute Import
import HelloWorld from 'components/DashBoard';
// Relative Import
import HelloWorld from '../../components/DashBoard';
Step 5: Update scripts
Now let us update scripts in package.json in order to test linting commands.
"lint": "eslint .",
"lint:fix": "eslint . --fix"
The --fix command fixes auto-fixable errors. Once the above scripts are updated we are ready to test the ESlint configuration which would scan all the javascript files. This can be done via command npm run lint.
Step 6: Install Husky
npm install husky -D
Step 7: Edit package.json > prepare script and run it once
The below command will trigger the enable git hook after installation.
npm pkg set scripts.prepare="husky install"
npm run prepare
Step 8: Add a hook
After executing the below command, a line npm run lint will be added to .husky/pre-commit which means npm run lint will run before we actually commit.npx husky add .husky/pre-commit "npm run lint"
Step 9: Test the pre-commit hook
Now let's test if our pre-commit hook is working or not. This can be done via the commands :git add .git commit -m "test commit"
Step 10: VScode configuration
Add a few extensions like EsLint and Prettier which helps us to update VSCode configurations such that now we can see linting and formatting errors. After this add a .vscode/settings.json file to the root of the project.
{
    "editor.formatOnSave": true,
    "eslint.alwaysShowStatus": true,
    "files.autoSave": "onFocusChange",
    "editor.defaultFormatter": "esbenp.prettier-vscode",
    "editor.codeActionsOnSave": [
        "source.formatDocument",
        "source.fixAll.eslint"
    ],
    "prettier.trailingComma": "es5"
}
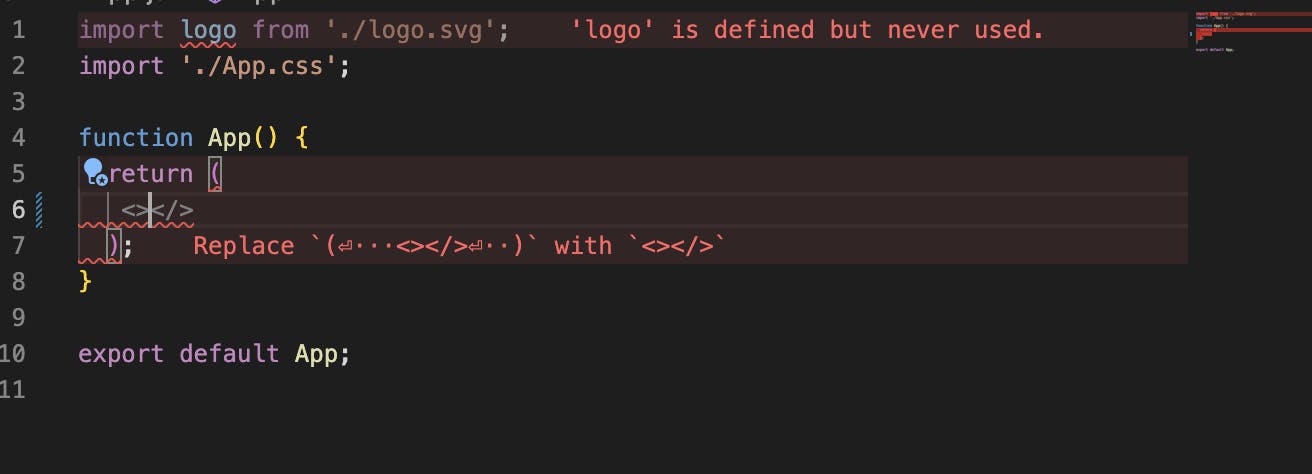
Once this is done we can see ESlint and Prettier running in our project :
Link for complete setup :
Thanks for reading. If you want to connect you can reach me on Twitter.